
12 July 2014
07 July 2014
Good 3G Network at Nigadi Pradhikaran, Pune
I have subscribed to 6GB Rs.950 monthly plan and its been a good association with Idea compared to my past experiences with Tata Docomo , Reliance etc.
So if you are looking for best internet connection in NIGDI , I would say go for IDEA. You will not regret it.
Hi There !
I am not sure if anyone would ever read this posts or any of the posts in this blog. I created this long long long back when I used to be in college. Its been a while since I myself visited this blog. Now that I am here, I decided to finally change the messed up template and start afresh.
I am no longer working for web development, so forgive me for all the messy UI or template that you may find in this blog. Unlike old days I do not have patience to dig around with templates and do CSS modifications.
I have been associated with a service based IT company in Pune for last 4 years working on Mainframes application maintenance and support project. I myself never realized how fast the time passed by. 4 years ?
My goodness. I am getting older and I hate it. But did anyone of us escape this natural process ?
Life has become monotonous now. And probably that is the reason I am back here. Yes, actually that is the reason. I am very much lost and I feel very shadowy of everything happening around me. I am no longer having fun with what I do at work. However i do not let it affect my actual work . I give my 100% and I am very well known for it. And that is the reason last 4 years I was one of the top employees for the project I worked for. Aaah.. enough of this crap.
Actual reason why I am online blogging is , I recently started another blog website related to Mainframes. I started revising mainframe concepts and reading books om them, so thought why not write posts and blog it.
Well anyways, Now that I am gonna be a regular blogger there, why not be here. So I will try to blog here as well. So until next post, Adios Amigos !
26 December 2010
Blog moved to TechSlam.Net
Hi
This blog has been moved to new permanent domain at TechSlam.Net. All further posts will be in this new domain. So see you there. Thanks :)
This blog has been moved to new permanent domain at TechSlam.Net. All further posts will be in this new domain. So see you there. Thanks :)
20 November 2010
A Long Gap
It's been a long time since I had any post in my blog. Been quite busy. Yes lot of things happened in the mean time and I need to get back to the track. Rails 3, Wordpress 3 etc. I have to update myself with these and get started again.
Meanwhile I have come across a wonderful learning resource on Rails 3 which I would like to share with everyone. It seems to be quite good to get your feet wet on Rails 3 :
By : Michael Hartl
Meanwhile I have come across a wonderful learning resource on Rails 3 which I would like to share with everyone. It seems to be quite good to get your feet wet on Rails 3 :
Ruby on Rails Tutorial
Learn Rails by ExampleBy : Michael Hartl
31 May 2010
Ruby Twitter Gem : Usage in Rails Application
In my current project, there was a requirement to show the latest tweet in the home page and also an interface to send tweets from the same rails application using a particular twitter account.
A quick Google search showed maximum results on a gem named 'Twitter'
here in this post I am going to use this gem to pull the latest tweets as well as, implementing a simple interface to send tweets directly.
There are wide possibilities using this gem, like, you can follow friends, unfollow friends, delete tweets, send direct messages, create lists etc etc.
So first of all Install the gem:
gem install twitter
If you have created a test rails application, create a new controller and name it as 'TwitterPublish'
ruby script/generate controller twitter_publishNow add the following code to your newly created 'TwitterPublishController'
Controller TwitterPublish < ApplicationController

  require 'rubygems'
  require 'twitter'

  def tweet
    httpauth = Twitter::HTTPAuth.new('twitter_username',  'password')
    @user = Twitter::Base.new(httpauth)
  end

end
In the above controller code, provide the required twitter login details.Next create a tweet.html.erb file within app/views/twitter_publish
and paste the following code :
<% @ user.friends_timeline.each do |tweet| %>
<%= image_tag "#{tweet.user[:profile_image_url]}" %>
<%= tweet.user[:screen_name] %> <br/>
<%= tweet.text %><br/>
<% end %>Now if we run the server, and check out the link http://localhost:3000/twitter_publish/tweets , we will find all the latest tweets from the people I am following will be listed down along with their image.Next, we need a text box in the same view isung which we will be able to tweet directly.
add the following code at the top of app/views/twitter_publish/tweet.html.erb :
<% form_for :twitter do |t| %>

  What's happening ?

  <%= t.text_field :tweet %><br/>

   <%= t.submit "Tweet" %>

<% end %>
And to create the update we send as tweet through the text field, we have to add the following code to our tweet method in TwitterpublishController:
if request.post?

  @user.update(params[:twitter][:tweet])

  redirect_to :action=>'tweet'

end
That's all, you can now tweet directly from your rails application.
I have also come across another gem for the same purpose named 'Twitter4R'
Have you tried this gem out ?
Do share your views on both the gems.
27 April 2010
Book Reviews : BukLuv.Com

BukLuv is the platform which will answer all these questions straight away.
BukLuv is a web application which is dedicated to the book lovers. After registering with this site, you can go ahead and share your reviews about the books you have read and if you do not find the book after searching through the site, you can add the book to the system along with the review. There are many other features and you can get to know it completely from BukLuv Blog. This web application is built using Ruby on Rails framework and is hosted at HostingRails .
Myself along with my friend Nithin always wanted to come out with a web application of our own and we used to brainstorm most of the spare-time we get. And finally the idea of book review application sounded quite cool. And we wanted to make the concept of book review out of the box compared to usual book reviewing websites out there and hence the concept of Mini-reviews where user can write reviews with 250 character limit. Once initial plan for the development was set, we began with the implementation. BukLuv was live on march 15th 2010 and after a month with the help of web-developer and a friend of ours Jaseem, we were able to launch much improved version of BukLuv on April 15th 2010. We have got some positive feedback’s on the application and are looking forward to bring many book lovers into this to get to know their feedback’s on the application.
So far so good. But bringing the application into the notice of wide audience is a real task ahead and we are doing our best to achieve it via social media marketing. Check out the twitter page of BukLuv at http://twitter.com/bukluv and the facebook page here.
Feel free to share your views about the application with us and also help us spread the word with the world book lovers community.
My new domain is at Aslam'sBuzz
Cheerz
02 April 2010
RubyConf India 2010- Impact on a Newbie
RubyConf India 2010 was one great success. Two days of valuable experience. I am a newbie to the Ruby Community. And I must say, this community rocks. With its wings starting to spread over India, it is indeed going to make a deep Impact. This Ruby Conference gave me and my friends an oppurtunity to interact with some of the great programming geeks of the world, like Ola Bini, Obie Fernandez, Nick Seiger, Satish Talim to mention a few. They are a real insipiration to a newbie like me.
Find the Full Post at the new domain of Aslam's Buzz at HERE
Find the Full Post at the new domain of Aslam's Buzz at HERE
06 March 2010
User Verification Using Rails AuthLogic Gem
So here comes the month of march. You must be thinking what's so special about March and if you have started thinking about the same, well, please do let me know if there is anything special about March. For now, let me get the things straight for this post.
Few months ago(I assume in January 2010), I had written a post on Rails gem called "AuthLogic" for the purpose of user authentication.
Here is the link for that post if you do not know, what is AuthLogic all about.
With the help of AuthLogic, we created a beautiful user registration and login/logout features for a web application. Here, when a user registers, on successful registration he will instantly get logged in. But in most web application, that is not the case, We need the registered user to verify his account before his account is activated, and for that, we need to send a verification email with verification related info to the user. So in this post I will be giving you all the necessary information with codes, on how this feature can be achieved.
Add the following codes to your Model "user_session.rb"
What this does is, when user tries to login, it will check if the user is a verified user or not. Well, so how do we know if the registered user has verified his account or not? Yes, we have to create a new field in our User Table. Here is the migration file for doing that:
On migration, new field called "verified" of type "boolean" will be added to the User Table in our database. Next, we will look into our controller which is responsible for creating a new user while user registers through our registration form. Well, while registration, the "create" method of "UserController" comes into the action, so we need to edit this file for sending verification information to the user's email:
what does line number 4 does? it call deliver_user_verifications! method on the user object. So we need to create a new method in our "User" model:
Here in this method we see that "user_verification_instructions" method of class Notifier is being called. So we create that method in models/notifier.rb file
Ok, so you now know, what "user_verification_instructions" method of "Notifier" class does. It sends the email to the user. This method will look for a file called app/views/notifier/user_verification_instructions.erb so let us create it
here the variable "@url" will have the link which we have given as subject previously. This is how your mail will look:

So from the link, we know, it looks into "show" method of "user_verifications" controller. We will have to create this controller with following codes:
here there is a "before_filter" which will check if the link is valid. if valid it will read show method. The show method needs to verify the user. It is done by the "verfiy!" method which needs to be created in "User Model"
Thanks
Few months ago(I assume in January 2010), I had written a post on Rails gem called "AuthLogic" for the purpose of user authentication.
Here is the link for that post if you do not know, what is AuthLogic all about.
With the help of AuthLogic, we created a beautiful user registration and login/logout features for a web application. Here, when a user registers, on successful registration he will instantly get logged in. But in most web application, that is not the case, We need the registered user to verify his account before his account is activated, and for that, we need to send a verification email with verification related info to the user. So in this post I will be giving you all the necessary information with codes, on how this feature can be achieved.
Add the following codes to your Model "user_session.rb"
class UserSession < Authlogic::Session::Base

validate :check_if_verified

  private

  def check_if_verified
    errors.add(:base, "You have not yet verified your account") unless attempted_record && attempted_record.verified
  end

end
What this does is, when user tries to login, it will check if the user is a verified user or not. Well, so how do we know if the registered user has verified his account or not? Yes, we have to create a new field in our User Table. Here is the migration file for doing that:
class AddVerifiedToUser < ActiveRecord::Migration

  def self.up
    add_column :users, :verified, :boolean, :default => false
  end

  def self.down
    remove_column :users, :verified
  end
end
On migration, new field called "verified" of type "boolean" will be added to the User Table in our database. Next, we will look into our controller which is responsible for creating a new user while user registers through our registration form. Well, while registration, the "create" method of "UserController" comes into the action, so we need to edit this file for sending verification information to the user's email:
def create
    @user = User.new(params[:user])
    if @user.save
      @user.deliver_user_verification_instructions!
      flash[:notice] = "Registration verification email sent.Please verify your account."
      redirect_to root_url
    else
      render :action => "new"
    end
  end
what does line number 4 does? it call deliver_user_verifications! method on the user object. So we need to create a new method in our "User" model:
def deliver_user_verification_instructions!
    reset_perishable_token!
    Notifier.deliver_user_verification_instructions(self)
  end
Here in this method we see that "user_verification_instructions" method of class Notifier is being called. So we create that method in models/notifier.rb file
def user_verification_instructions(user)
    subject    'User verification instructions'
    recipients user.email
    from       'XYZ Notifications'
    sent_on    Time.now

    @body[:url]  = "http://test.domain.com/user_verifications/show/#{user.perishable_token}"
  end
Ok, so you now know, what "user_verification_instructions" method of "Notifier" class does. It sends the email to the user. This method will look for a file called app/views/notifier/user_verification_instructions.erb so let us create it
You have created an account for http://domain.com
Please follow the link below to verify your account and get started with XYZ

<%= @url %>

If the above URL does not work try copying and pasting it into your browser.
If you continue to have problem please feel free to contact us.
here the variable "@url" will have the link which we have given as subject previously. This is how your mail will look:

So from the link, we know, it looks into "show" method of "user_verifications" controller. We will have to create this controller with following codes:
class UserVerificationsController < ApplicationController

  before_filter :load_user_using_perishable_token

  def show
    if @user
      @user.verify!
      flash[:notice] = "Thank you for verifying your account. You may now login."
    end
    redirect_to root_url
  end

  private

  def load_user_using_perishable_token
    @user = User.find_using_perishable_token(params[:id])
    flash[:notice] = "Unable to find your account." unless @user
  end

end
here there is a "before_filter" which will check if the link is valid. if valid it will read show method. The show method needs to verify the user. It is done by the "verfiy!" method which needs to be created in "User Model"
def verify!
    self.verified = true
    self.save
  end
That is it. On successful verification, the verified field gets a value of one and thus, user will be able to log in. So have you guys tried any other ways of doing this. Please share your ideas with me.
Thanks
27 February 2010
Some Ruby Code Snippets For Fun!
Aah Well, I see that I have not written anything here for quite a while in the month of February.
The reason I must say is in this month I haven't touched anything special to pen it down. But the eager to write down something , is the result you see this post coming up.
You would enjoy this only if you are a Ruby enthusiast or a hardcore programming freak.
Nothing special, a few Ruby tips to share :)
Tip #1
You have a ruby program which you run though command, see the result in command and have a feel that, you would want the output to be saved in your computer in some text files. Here is what you can do while executing the program
Tip #2
Using YAML to write string into a file and then load the same file.
About YAML:
YAML is a format for representing objects as strings. You can use other formats, but YAML is nice because it’s human-readable (and human-editable) as well as computer-readable.
YAML is not actually part of the Ruby core, but it is part of the standard distribution.When you install Ruby, you install YAML, too. But if you want to actually use YAML, you’ll need to import it into your program. This is really easy, with the require method:
Here is the code snippet which will create a text file and save the string:
When we run this program from the command, it creates a text file in the same directory where the actual program file exists and writes the data given in the program.
The reason I must say is in this month I haven't touched anything special to pen it down. But the eager to write down something , is the result you see this post coming up.
You would enjoy this only if you are a Ruby enthusiast or a hardcore programming freak.
Nothing special, a few Ruby tips to share :)
Tip #1
You have a ruby program which you run though command, see the result in command and have a feel that, you would want the output to be saved in your computer in some text files. Here is what you can do while executing the program
ruby test_program.rb > output.txt
Tip #2
Using YAML to write string into a file and then load the same file.
About YAML:
YAML is a format for representing objects as strings. You can use other formats, but YAML is nice because it’s human-readable (and human-editable) as well as computer-readable.
YAML is not actually part of the Ruby core, but it is part of the standard distribution.When you install Ruby, you install YAML, too. But if you want to actually use YAML, you’ll need to import it into your program. This is really easy, with the require method:
Here is the code snippet which will create a text file and save the string:
require ' yaml'

def yaml_save object, filename
  File.open filename, ' w' do |f|
    f.write(object.to_yaml)
  end
end

def yaml_load filename
  yaml_string = File.read filename
  YAML::load yaml_string
end

test_array = ['My name is Aslam!' ,
'I love coding in Ruby!' ,
'And in free time, I hangout with friends!' ]

filename = 'AboutMe.txt'
# We save it...
yaml_save test_array, filename
# We load it...
read_array = yaml_load filename
When we run this program from the command, it creates a text file in the same directory where the actual program file exists and writes the data given in the program.
12 February 2010
RubyConf India 2010

Being a Ruby On rails developer, when I heard about this news, I was all excited and really wanted to witness this event. I was eagerly waiting for the registration to open, And on the day when the registration was open, I did not waste any time in grabbing a ticket for myself. Along with me my other Ruby on Rails friends have also registered for the event. Everyone at my work place is very much excited about this event, mainly because of the presentation of Project Fedena.
With the presence of some of the eminent personalities in this field like Chad Fowler, Ola Bini etc, it is going to be one of the most memorable days of my life. And indeed being a newbie into Ruby and Rails, this event is really going to boost me up in future.
29 January 2010
Generating Calendar With Rails
Download the source code from GitHub
Working on a Rails CMS based project using BrowserCMS, there was a requirement to have a page which would display a calendar for the current month and onClick of each date, it has to make an Ajax request to query the database table and update a portion on the same page.
Everything is fine with the requirement, but a Rails calendar with each date sending an Ajax request to the controller?
My initial move was to look for some Rails plugin which would serve this purpose. Had a thorough Google search on this. Time was ticking, I managed to find one or two Rails calendar Plugin, but when tried on my project, it did not serve the exact purpose of each date sending the Ajax request. No much help was there on this in any Rails based forum as well.
This finally made me to think of writing the code for generating the calendar of my own. It was indeed going to be a tough task. But I had no other choice left in-front of me.
I have shared the code for the same through my GitHub account.
There in the GitHub repository you will find only a controllers folder and a views folder. Well that's all we need to get this done. If you have a Rails project up and running, you can go ahead and generate this Calendar Controller and use the code and modify it, style it as per your own requirement.
Here what I have done is, in the "calendar index" page you can see the calendar for the current month, with links for next and previous months, so that you can have a view of all the months. When you click on the next/previous links, the months partial is being updated. Similarly, onClick of each date will update a test "div" with the value of month and date. You can apply any logic here and make it work for your purpose.
Ruby/Rails Tips for the day:
=>How to get the starting day of the month ?
=>How to get the last day of the month ?
=>How to get the weekday of a particular date?
Special thanks to Nithin Bekal who helped me in getting this work done in no time.
If anyone uses this code for their application, please share with me the improvements made.
Working on a Rails CMS based project using BrowserCMS, there was a requirement to have a page which would display a calendar for the current month and onClick of each date, it has to make an Ajax request to query the database table and update a portion on the same page.
Everything is fine with the requirement, but a Rails calendar with each date sending an Ajax request to the controller?
My initial move was to look for some Rails plugin which would serve this purpose. Had a thorough Google search on this. Time was ticking, I managed to find one or two Rails calendar Plugin, but when tried on my project, it did not serve the exact purpose of each date sending the Ajax request. No much help was there on this in any Rails based forum as well.
This finally made me to think of writing the code for generating the calendar of my own. It was indeed going to be a tough task. But I had no other choice left in-front of me.
I have shared the code for the same through my GitHub account.
There in the GitHub repository you will find only a controllers folder and a views folder. Well that's all we need to get this done. If you have a Rails project up and running, you can go ahead and generate this Calendar Controller and use the code and modify it, style it as per your own requirement.
Here what I have done is, in the "calendar index" page you can see the calendar for the current month, with links for next and previous months, so that you can have a view of all the months. When you click on the next/previous links, the months partial is being updated. Similarly, onClick of each date will update a test "div" with the value of month and date. You can apply any logic here and make it work for your purpose.
Ruby/Rails Tips for the day:
=>How to get the starting day of the month ?
Loading development environment (Rails 2.3.5)
>> date = Date.today
=> Fri, 29 Jan 2010
>> start_date = Date.parse "#{date.year}-#{date.month}-01"
=> Fri, 01 Jan 2010
=>How to get the last day of the month ?
>> last_date = (start_date >> 1)-1
=> Sun, 31 Jan 2010
=>How to get the weekday of a particular date?
>> start_date.wday
=> 5
Special thanks to Nithin Bekal who helped me in getting this work done in no time.
If anyone uses this code for their application, please share with me the improvements made.
26 January 2010
Custom Blog Post Reordering In WordPress
Wordpress is no doubt one of the best CMS around and with the awesome community out there contributing in all ways to make it the best of the best is really appreciative.
Well, few days back working on a wordpress project for a client, The client came up with some requirement and that was like, he would like to manually rearrange the Posts the way he wants and not the default date ordering of Wordpress.
But I had never heard about custom post order ever before untill the client mentioned about it and that made me look for the right plugin which would make this work out for me. And guess what, I came up with nearly 3 plugins which would serve the purpose.
I installed it on my test domain and checked it out. Whohooo! they worked and I settled with a plugin named Blog Reordering.
Installed it in the client's domain and then on client request documented the best way to use this plugin to reorder the posts and drafted a mail to him. Here's the mail which I prepared for the client:
That's all about it. Did I miss anything relevant about this plugin ? Please do share it with me.
Thanks
Well, few days back working on a wordpress project for a client, The client came up with some requirement and that was like, he would like to manually rearrange the Posts the way he wants and not the default date ordering of Wordpress.
But I had never heard about custom post order ever before untill the client mentioned about it and that made me look for the right plugin which would make this work out for me. And guess what, I came up with nearly 3 plugins which would serve the purpose.
I installed it on my test domain and checked it out. Whohooo! they worked and I settled with a plugin named Blog Reordering.
Installed it in the client's domain and then on client request documented the best way to use this plugin to reorder the posts and drafted a mail to him. Here's the mail which I prepared for the client:
As you want the posts to be reordered manually and do not want them to show up according to the date and time settings, We have a plugin named Post Reorder which will help us to the stuff of custom reordering of posts as we want.
Well, As it gives you the freedom to custom reorder the posts, Its kind of a manual work to reorder the posts as well.
And here's how you can achieve it:
1.Navigate to Blog Reordering section which is at the very bottom Settings in admin page of the wordpress.
2.Here you can find options such as "Blog reordering Settings", "Quick reorder by field" and "Blog reordering"
3. Let the first two option be as it is.
4. We need to worry only about the third option and that is where all reordering stuff takes place.
5.Here you can find all the posts listed down with the "ordering" numbed 1,2,....etc to the latest post you have up to date.
6.Now its all manual task, where you have to identify the right posts of each category and number them in the order you want.
For example:
You have 25 posts in personal category and all the 25 are randomly ordered and ordering number is also random according to the order they were posted.
Well, you need not worry about the random order each of the 25 posts of "personal" category has got, you can just go ahead and number them from 1 to 25 in the order you want them to display and that's it. When you check out the personal category page, all the 25 posts will be ordered the way you have set them. Now that's called absolute freedom!
Well, if there is no name to each of your posts, then it is kind of hectic knowing which posts is which one and the only option is to identify them via their ID's.
That's all about it. Did I miss anything relevant about this plugin ? Please do share it with me.
Thanks
25 January 2010
Share Source Code Using GitHub- It's Social Coding!
Done writing the codes of your current project? And is excited about it and want the whole developer community to know about your latest project? Then Lets Git It!
Yes, I am also equally excited about my latest project and I wanted it to share with the developer community through GitHub-Social Coding!
The application was developed using Ruby On Rails and hence the hosting provider is HostingRails. So I have my application running up there. So all I had to do was commit the source code from HostingRails into the GitHub repository.
I will be explaining the exact procedure that I followed to commit the source code of my application into GitHub repository directly from HostingRails.
I use PuTTy which is an open source telnet and SSH Client for the Windows and Unix platforms.
Since my application was hosted in HostingRails, I logged into it via PuTTy and I was taken into my root folder. If you are not aware of PuTTy interface, then I would say it is just a Unix Terminal for you to work on. So from the root folder I had to get in my project folder which I did using CD command.
Well before we do anything , a GitHub account is necessary or else where are we going to commit all our source code! So I did create a GitHub Account and I am all set for Social Coding.
Next I had to create a New repository.(See Images)

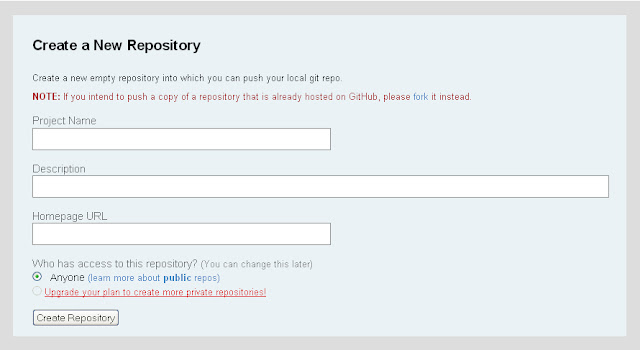
Once I provided all the information for creating the repository, I hit create-repository. And that's all. After I created the repository, I was redirected to the new repository page which had the basic information on how to commit the source codes.
here's what i did for committing the source code for my application.
In PuTTy, as i was already in my application folder:
Next i had to initialize the git in my application:
Once initialized, I had to include all the folders and files.
And after that commit it
Then I had to add the remote origin
In the above command "git@github.com:techslam/test.git" is the URl which we find at the top of the page after successfully creating the repository.(See Image)

And finnaly we push it:
And that's it. When I checked my repository all my source code was ready to be shared with the wonderful development community out there.
So Folks, what's your say on GitHub feature. I am really enjoying it and is going to explore it deeper and deeper.
Yes, I am also equally excited about my latest project and I wanted it to share with the developer community through GitHub-Social Coding!
The application was developed using Ruby On Rails and hence the hosting provider is HostingRails. So I have my application running up there. So all I had to do was commit the source code from HostingRails into the GitHub repository.
I will be explaining the exact procedure that I followed to commit the source code of my application into GitHub repository directly from HostingRails.
I use PuTTy which is an open source telnet and SSH Client for the Windows and Unix platforms.
Since my application was hosted in HostingRails, I logged into it via PuTTy and I was taken into my root folder. If you are not aware of PuTTy interface, then I would say it is just a Unix Terminal for you to work on. So from the root folder I had to get in my project folder which I did using CD command.
Well before we do anything , a GitHub account is necessary or else where are we going to commit all our source code! So I did create a GitHub Account and I am all set for Social Coding.
Next I had to create a New repository.(See Images)


Once I provided all the information for creating the repository, I hit create-repository. And that's all. After I created the repository, I was redirected to the new repository page which had the basic information on how to commit the source codes.
here's what i did for committing the source code for my application.
In PuTTy, as i was already in my application folder:
email@email.com [~/rails/My_Project]#
Next i had to initialize the git in my application:
email@email.com [~/rails/My_Project]#git init
Initialized empty Git repository in /home/fedenac/rails/testing/.git/
Once initialized, I had to include all the folders and files.
email@email.com [~/rails/My_Project]#git add .
And after that commit it
email@email.com [~/rails/My_Project]#git commit -m 'any message here'
Then I had to add the remote origin
email@email.com [~/rails/My_Project]#git remote add origin git@github.com:techslam/test.git
In the above command "git@github.com:techslam/test.git" is the URl which we find at the top of the page after successfully creating the repository.(See Image)

And finnaly we push it:
email@email.com [~/rails/My_Project]#git push origin master
And that's it. When I checked my repository all my source code was ready to be shared with the wonderful development community out there.
So Folks, what's your say on GitHub feature. I am really enjoying it and is going to explore it deeper and deeper.
16 January 2010
David Heinemeier Hansson of 37signals at FOWA Dublin 2009
David Heinemeier Hansson - FOWA Dublin 2009 from Carsonified on Vimeo.
David Heinemeier Hansson discusses the prospects of starting a business in “The Real World”. David explains that “The Real World” is filled with naysayers that say your idea won’t work. The first thing that an entrepreneur should do is ignore “The Real World”. David takes down the many myths of “The Real World” while sharing his successes in the face of all the naysayers.
For more of such talks check out 37Signals-Speaks
10 January 2010
Moving along with BrowserCMS
As I have mentioned in one of my previous posts that, the project I am associated at present deals with setting up a Content management System using BrowserCMS. Its been quite a some time I am involved in this project and in the mean time learnt a lot about this CMS. The best part is that, the CTO of BrowserMedia Mr.Patrick Peak would answer to any of your doubts related to BrowserCMS. I have had a lot of questions related to BCMS and most of them were answered by him in a matter of day. So Iam really thankful to him and really appreciate the work he has been doing.
This project is taking quite a bit of time to get it completed because of some special requiremnts from the client like setting up Multi Language functionality. Though BrowserCMS don't have a built in support for i18n(As told by Mr.Patrick Peak,CTO BrowserMedia), It was a huge challenge for me to bring some unique concept of Multi Language functionality in Browser CMS. Well, I did make a quite a bit of research on this and finally came up with indeed a unique concept to get this requirement done.
The concept has been explained to our client and is waiting to get his approval.
In the coming posts you can expect, the Idea behind setting up the Multi Language Functionality using browser CMS. So stay tuned. Till then CiaO
Ruby Tip of the day:
To check if there is an item in an array...
>> ['Cat', 'Dog', 'Bird'].include? 'Dog'
=> true
03 January 2010
User Authentication in Rails : AuthLogic
Working on any web application, there is always a need to have user authentication system running in the application. Ruby on Rails is blessed to have a such an active community which always comes up with solutions to rails of any kind. For user authentication there is an awesome plugin called AuthLogic. I have used this plugin in an application I am currently associated with and it works like a charm.
In this post you can find step by step instruction on getting this plugin up and running in your application.
Installing AuthLogic
AuthLogic can either be installed as a plugin or as a gem. I would rather go with installing a gem. So from the command line:
So from command line create a new application named user_authentication_demo
So create a controller by:
(Make sure you have <%= flash[:notice] %> in there to get the flash messages)
Next open up the config/database.yml find athen replace the entire content here with the following code
All I have done is removed unwanted junk of codes from there to keep it straight and simple.
Now if we run the server and go to http://localhost:3000/blog, we will be taken to the dummy page as shown below:

We will be adding the user authentication to the above page. In this page we will be showing "Register","Login" links if the user is not logged in and "Edit Profile","Logout" links if the user is logged in.
Next we need to create Model and Controller for Users. First we will be generating our User Model
Thats it. We are set to go with our application with this wonderfull gem/plugin for the user authentication functionality.
In this post you can find step by step instruction on getting this plugin up and running in your application.
Installing AuthLogic
AuthLogic can either be installed as a plugin or as a gem. I would rather go with installing a gem. So from the command line:
gem install authlogicAfter installing the gem, we will be creating a very simple rails application just to test the user authentication functionality via authlogic gem.
So from command line create a new application named user_authentication_demo
C:\>rails user_authentication_demo -d mysqlafter the application is created, lets just go ahead and create a dummy controller dummy method in the controller and a dummy view. This is just to have a page up and running where we will be displaying the working of user authentication functionality.
So create a controller by:
C:\user_authentication_demo>ruby script/generate controller home indexYou can add some dummy text in your app/views/index.html.erb file just for fun. Working on rails, you got enough time for fun stuffs !
(Make sure you have <%= flash[:notice] %> in there to get the flash messages)
Next open up the config/database.yml find athen replace the entire content here with the following code
development:
      host: localhost
      adapter: mysql
      database: user_authentication_demo_development
      port: 3307
      username: root
      password:

test:
      host: localhost
      adapter: mysql

production:
      host: localhost
      adapter: mysql
All I have done is removed unwanted junk of codes from there to keep it straight and simple.
Now if we run the server and go to http://localhost:3000/blog, we will be taken to the dummy page as shown below:

We will be adding the user authentication to the above page. In this page we will be showing "Register","Login" links if the user is not logged in and "Edit Profile","Logout" links if the user is logged in.
Next we need to create Model and Controller for Users. First we will be generating our User Model
C:\user_authentication_demo>ruby script/generate model userAfter all the associated files are created, we will edit the migration file at db/migrate/20100103124423_create_users.rb and ad the following codes in it.
class CreateUsers < ActiveRecord::Migration
  def self.up
    create_table :users do |t|
      t.string :username
      t.string :email
      t.string :crypted_password
      t.string :password_salt
      t.string :persistence_token
      t.timestamps
    end
  end

  def self.down
    drop_table :users
  end
end
AuthLogic can pretty much handle fields called email, crypted_password, password_salt and persistence_token and hence we need not bother much about them So let's go ahead and run rake to create the database tables C:\user_authentication_demo>rake db:migrateNext we will have to edit the app/models/user.rb file and add the following codes in it
class User < ActiveRecord::Base
  acts_as_authentic
end
This is to add the Authlogic to the class, without which it will be just a standard model class. Our next task is to create users controller. Also we require new and edit views, and hence we will make sure to create them through generators by the following command
C:\user_authentication_demo>ruby script/generate controller users new editNext we need to modify config/routes.rb file a bit and add the following line of code
map.resources :usersNow inorder to display the link for "Register" , in all the pages of your application add the following lines in your app/views/layouts/application.html.erb file(If you dont have application.html.erb file, then create it)
<%= yield %>Next add the following bunch of code in app/controllers/user_controller.rb
class UsersController < ApplicationController

 def new
  @user = User.new
 end

 def create
  @user = User.new(params[:user])
  if @user.save
   flash[:notice] = "Registration successful."
   redirect_to :controller=>"blog"
  else
   render :action => 'new'
  end
 end

 def edit
 end

end
We will be putting the code for registration in a partial as we will require it for registration as well as editing. So create a patial file in app/views/users/_user.html.erb and add the following codes in it.
<% form_for @user do |form| %> <%= form.error_messages %>And then add the following code in the app/views/users/new.html.erb to call the partial for registration purpose<% end %>
- <%= form.label :username, "Username" %> <%= form.text_field :username %>
- <%= form.label :email, "Email" %> <%= form.text_field :email %>
- <%= form.label :password, "Password" %> <%= form.password_field :password %>
- <%= form.label :password_confirmation, "Password confirmation" %> <%= form.password_field :password_confirmation %>
- <%= form.submit "Submit" %>
<%= render @user %>Now if we check http://localhost:3000/blog we will see the "register" link and if we click on the link, we will be taken to the registration form. If we click on the register button without entering any details, we will get the validation errors and if we enter valid data and then register we will be redirected to blog page. So far so good. next we will add a "Login" link next to "registration" link to let our users to login to the application. For this we have to create UserSession model to get the current status of our users. From the command line,
C:\user_authentication_demo>ruby script/generate session user_sessionThis generator will create UserSession model and this model will be just have an empty class. Next we generate controller for the UserSession
C:\user_authentication_demo>ruby script/generate controller UserSessionsAnd add the following codes within the UserSessions Controller
class UserSessionsController < ApplicationController

 def new
   @user_session = UserSession.new
 end

 def create
   @user_session = UserSession.new(params[:user_session])
   if @user_session.save
     flash[:notice] = "Successfully logged in."
    redirect_to :controller=>"blog"
   else
     render :action => 'new'
   end
 end

 def destroy
   @user_session = UserSession.find
   @user_session.destroy
   flash[:notice] = "Successfully logged out."
   redirect_to :controller=>"blog"
 end

end
Next create a view file in app/views/user_sessions/new.html.erb and add the following codes <% form_for @user_session do |form| %> <%= form.error_messages %>We will have to edit the config/routes.rb a bit to add the following codes.<% end %>
- <%= form.label :username, "Username" %> <%= form.text_field :username %>
- <%= form.label :password, "Password" %> <%= form.password_field :password %>
- <%= form.submit "Submit" %>
map.login 'login', :controller => 'user_sessions', :action => 'new'
  map.logout 'logout', :controller => 'user_sessions', :action => 'destroy'
  map.resources :user_sessions
We can also modify our application.rhtml file to add the link for login
Now if we check our blog page along with "Register" link we also ha "Login" link and if we click on "Login", we will be taken to a Login page with fields for username and password. Upon valid username and password entry, we will be taken to blog page with a flash message. On invalid login details, we will end up with validation errors. Our next aim is to write code for logging out and display "Edit Profile" and "Logout" Links for the logged in users. So let us modify the application.rhtml and have the following codes in there:
<%= yield %>And also add the following code in the app/controllers/application_controller.rb
class ApplicationController < ActionController::Base
    helper_method :current_user

    private
    def current_user_session
      return @current_user_session if defined?(@current_user_session)
      @current_user_session = UserSession.find
    end

    def current_user
     @current_user = current_user_session && current_user_session.record
   end
end
To make the "Edit profile" working modify the user_session controller to class UsersController < ApplicationController
def new
@user = User.new
end
def create
@user = User.new(params[:user])
if @user.save
flash[:notice] = "Registration successful."
redirect_to :controller=>"blog"
else
render :action => 'new'
end
end
def edit
@user = current_user
end
def update
@user = current_user
if @user.update_attributes(params[:user])
flash[:notice] = "Successfully updated profile."
redirect_to :controller=>"blog"
else
render :action => 'edit'
end
end
end
And then we have to call the form partial by adding the following code within /app/views/users/edit.html.erb <%= render @user %>
Thats it. We are set to go with our application with this wonderfull gem/plugin for the user authentication functionality.
Subscribe to:
Posts (Atom)